Battery switch on travel trailer function is crucial for managing your RV’s power. Understanding how to use and maintain your battery switch is key to preventing electrical issues and ensuring a smooth camping experience. This guide will walk you through different switch types, operation, troubleshooting, safety, and maintenance, making sure you’re well-equipped to handle any power situation on the road.
We’ll cover everything from identifying the type of switch in your travel trailer to understanding the different switch positions and how they affect your power flow. We’ll also delve into troubleshooting common problems, ensuring you can quickly diagnose and fix any issues that arise. Safety is paramount, so we’ll cover important safety precautions to keep you and your RV safe.
Finally, we’ll discuss routine maintenance and replacement procedures, helping you keep your system running smoothly for years to come.
Safety Precautions When Using a Battery Switch: Battery Switch On Travel Trailer Function
Working with a travel trailer’s battery switch might seem straightforward, but neglecting safety precautions can lead to serious consequences, including electric shock, burns, explosions, and even fire. Understanding the potential hazards and following proper procedures is crucial for safe operation and maintenance.
Improper handling of your battery switch can result in a variety of dangerous situations. A short circuit, for example, could generate intense heat, potentially igniting nearby flammable materials. Incorrectly connecting the switch could lead to a dangerous backfeed of power, damaging your trailer’s electrical system or causing injury. Furthermore, working with batteries always carries the risk of exposure to corrosive battery acid, which can damage your skin, eyes, and clothing.
Battery Switch Safety Procedures
Before working with your battery switch, it’s essential to follow a series of steps to minimize the risk of accidents. These procedures are designed to protect you and your equipment.
- Always disconnect the negative (-) battery cable first. This prevents accidental short circuits and ensures that the power is completely cut off before you begin any work.
- Wear appropriate safety gear. This includes safety glasses to protect your eyes from splashes of battery acid, gloves to protect your hands from corrosion, and closed-toe shoes to protect your feet.
- Ensure adequate ventilation. Battery gases are flammable and can be harmful if inhaled. Work in a well-ventilated area or use a respirator if necessary.
- Never work on the battery switch while the engine is running. This will ensure that you are not dealing with high voltage.
- Inspect the switch and wiring for any signs of damage before use. Look for frayed wires, corrosion, or loose connections. Replace any damaged components immediately.
- After completing any work, reconnect the battery cables in the reverse order: positive (+) first, then negative (-).
- If you’re unsure about any aspect of working with your battery switch, consult a qualified technician or refer to your trailer’s owner’s manual. Don’t hesitate to seek professional help.
Potential Hazards of Incorrect Operation
Several significant risks are associated with improperly using or maintaining your travel trailer’s battery switch. These hazards can range from minor inconveniences to serious injuries.
- Electric Shock: Incorrect handling can lead to accidental contact with live wires, resulting in electric shock.
- Burns: Short circuits can generate significant heat, potentially causing burns to skin and eyes.
- Battery Acid Exposure: Battery acid is corrosive and can cause serious damage to skin, eyes, and clothing.
- Fire Hazard: Sparks or excessive heat from a short circuit can ignite nearby flammable materials.
- System Damage: Incorrect connections can damage the electrical system of your travel trailer, leading to costly repairs.
Battery Switch Maintenance and Replacement

Keeping your travel trailer’s battery switch in good working order is crucial for reliable power. Regular maintenance prevents problems and extends the life of your switch, saving you potential headaches and expenses down the road. Neglecting maintenance can lead to premature failure, leaving you stranded without power.Routine maintenance is straightforward and only takes a few minutes. By following these simple steps, you can ensure your battery switch continues to function flawlessly, providing a reliable power source for your adventures.
Routine Battery Switch Maintenance
Regular inspection is the cornerstone of battery switch maintenance. Start by visually inspecting the switch for any signs of corrosion, loose connections, or physical damage. Look closely at the terminals and the switch itself for any signs of wear and tear. Corrosion can impede electrical conductivity, potentially leading to poor performance or even complete failure. Loose connections are another common issue, creating intermittent power disruptions or even fire hazards.
So, you’re an audiophile who travels? Awesome! Check out this guide on creating the perfect audiophile travel setup for apartment living – it’s all about packing light but smart. Then, if your adventures take you to more rugged terrain, consider the tips offered in this resource on audiophile travel setups for mountain explorations; it focuses on durability and portability.
Both guides will help you keep your ears happy, no matter where your travels take you!
Pay close attention to the switch’s casing for any cracks or damage that could compromise its weatherproofing.
- Clean the terminals: Use a wire brush or sandpaper to clean any corrosion from the battery terminals and the switch terminals. A baking soda and water paste can also be effective for stubborn corrosion. Ensure all connections are clean and shiny before proceeding.
- Tighten connections: Check that all terminal connections are securely tightened. Use a wrench of the appropriate size to ensure a firm connection. Loose connections can lead to overheating and poor performance.
- Inspect the switch housing: Examine the switch housing for any cracks, damage, or signs of water intrusion. If any damage is found, consider replacing the switch to prevent future problems. Water damage can cause corrosion and electrical shorts.
- Lubricate the switch mechanism (if applicable): Some switches have moving parts that can benefit from lubrication. Use a small amount of dielectric grease on these parts to ensure smooth operation and prevent corrosion. Never use regular grease, as it can attract dirt and moisture.
Signs of a Failing Battery Switch
Several indicators suggest your battery switch needs replacing. These include intermittent power failures, noticeable arcing or sparking around the switch, excessive heat generation during use, or a switch that feels unusually loose or difficult to operate. These problems could indicate internal damage or corrosion within the switch, posing a safety risk and necessitating immediate replacement. Ignoring these signs can lead to more serious problems and potentially costly repairs.
So, you’re an audiophile who travels? Awesome! Setting up your sound on the go can be tricky, but totally doable. Check out this guide on audiophile travel aetup for tips on packing your gear safely. Then, once you’ve got your essentials sorted, consider lightweight, high-quality headphones. For extra inspiration on compact audio setups perfect for your adventures, browse through another great resource on audiophile travel aetup – it’s packed with practical advice and gear recommendations.
Happy listening!
Replacing a Battery Switch
Replacing a faulty battery switch is a relatively straightforward task, but safety precautions should always be taken. Before beginning, disconnect both the positive and negative battery cables. This is crucial to prevent accidental shorts and potential injury. Always wear safety glasses to protect your eyes from sparks or debris.
- Gather your tools: You will need a wrench or socket set to remove the terminal connections, a screwdriver (possibly Phillips and flathead), and a new battery switch that matches your current setup. Having a wire brush or sandpaper on hand is also helpful for cleaning the terminals.
- Disconnect the battery cables: Carefully disconnect the positive (+) and negative (-) battery cables from the switch. Label the cables clearly to avoid confusion during reinstallation.
- Remove the old switch: Use the appropriate screwdriver to remove the mounting screws holding the switch in place. Carefully remove the old switch from its housing.
- Install the new switch: Mount the new switch in the same location as the old switch, ensuring it is securely fastened. Pay attention to the orientation of the switch to match the previous setup.
- Reconnect the battery cables: Reconnect the positive (+) and negative (-) battery cables to the new switch, ensuring they are securely tightened. Double-check the connections to prevent any loose connections.
- Test the switch: Turn the switch on and off to ensure it’s functioning correctly. Check your trailer’s electrical systems to confirm that power is flowing correctly to all components.
Integrating Battery Switches with Other RV Systems
Your battery switch isn’t just a simple on/off; it’s the central nervous system for your RV’s power. Understanding how it interacts with other systems like solar panels, inverters, and charging systems is crucial for efficient and safe power management. Proper integration ensures your appliances receive power from the most appropriate source, maximizing battery life and preventing potential damage.Integrating your battery switch with other RV systems requires careful planning and wiring.
The goal is to route power intelligently, allowing you to select which power source feeds your RV’s electrical demands. This can involve using a combination of fuses, circuit breakers, and appropriately sized wiring to handle the power demands of each system. Incorrect wiring can lead to short circuits, blown fuses, or even fires.
Battery Switch Integration with Solar Panels
Solar panels generate DC power, which needs to be regulated and then routed to your battery bank. A charge controller manages the solar input, preventing overcharging and ensuring efficient energy transfer. The battery switch then allows you to select whether you want to use the solar-charged batteries to power your RV, or to leave the solar charging the batteries while you use shore power.
A common configuration involves connecting the charge controller’s output to the battery bank, with the battery switch controlling the path to your RV’s DC distribution panel.
Battery Switch Integration with Inverters
Inverters convert DC power from your batteries into AC power, needed for most household appliances. The battery switch controls the flow of DC power to the inverter. When the switch is in the “on” position for the house batteries, the inverter can draw power to produce AC. If you’re using shore power, the inverter is typically bypassed as shore power provides AC directly.
This prevents the inverter from unnecessarily drawing power from your batteries. It’s important to size your inverter and wiring appropriately to handle the power demands of your AC appliances.
Battery Switch Integration with Charging Systems
Your RV’s charging system, whether it’s a converter/charger from shore power or a generator, also interacts with the battery switch. The converter/charger typically connects directly to the batteries, and the battery switch doesn’t directly control the charging process itself. However, the switch dictates whether the charged batteries power your RV’s DC systems. If the switch is in the “off” position for the house batteries, the charging system will still charge the batteries, but the RV systems won’t be able to draw power from them.
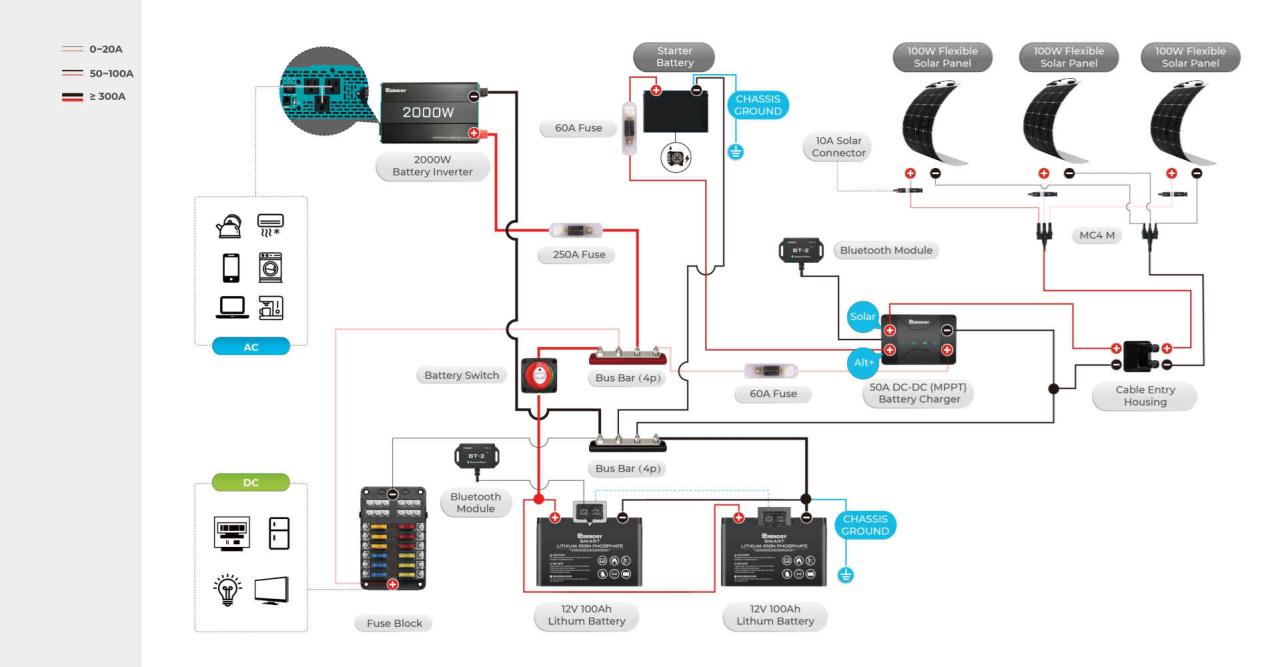
Diagram of RV Electrical System Integration, Battery switch on travel trailer function
Imagine a diagram with several key components. First, you have your two battery banks (house and chassis) connected to a battery switch. This switch acts like a multi-way switch, directing power from either battery bank to a central DC distribution panel. Connected to this panel are various DC loads like lights, water pumps, and 12V outlets. Separate from the battery switch, you have a solar panel array connected to a solar charge controller.
The controller’s output is wired directly to the house battery bank. Another branch shows a shore power inlet connected to a converter/charger, which charges the house battery bank. Finally, there’s an inverter, drawing DC power from the house battery bank (controlled by the battery switch) and converting it to AC power for your AC appliances. All connections are protected by appropriately sized fuses and circuit breakers.
Each component has clearly labeled positive and negative connections. The lines representing wires show the flow of power, illustrating how the battery switch controls the direction of DC power from the batteries to the various loads and systems.
Mastering your travel trailer’s battery switch is essential for a worry-free RV experience. By understanding the various types, their operation, and troubleshooting techniques, you’ll be confident in managing your power and preventing potential problems. Remember to always prioritize safety when working with electrical systems. With a little knowledge and attention to detail, you can keep your battery switch functioning optimally, ensuring power whenever and wherever you need it.
Common Queries
What happens if I leave my battery switch in the “both” position?
Leaving it in “both” constantly can drain your batteries faster, especially if you’re not actively charging them. It’s best to switch to “off” when not using the RV for extended periods.
How often should I check my battery switch for corrosion?
Inspect your battery switch terminals for corrosion at least twice a year, or more frequently if you live in a humid climate.
Can I use a different type of battery switch than the original?
It’s generally best to replace with the same type or a compatible equivalent to avoid issues with your RV’s electrical system. Consult your RV’s manual or a qualified technician.
My battery switch is hot to the touch. Is this normal?
No, a hot battery switch indicates a problem. Turn off the switch immediately and investigate for loose connections or other faults. A qualified electrician should inspect it.
